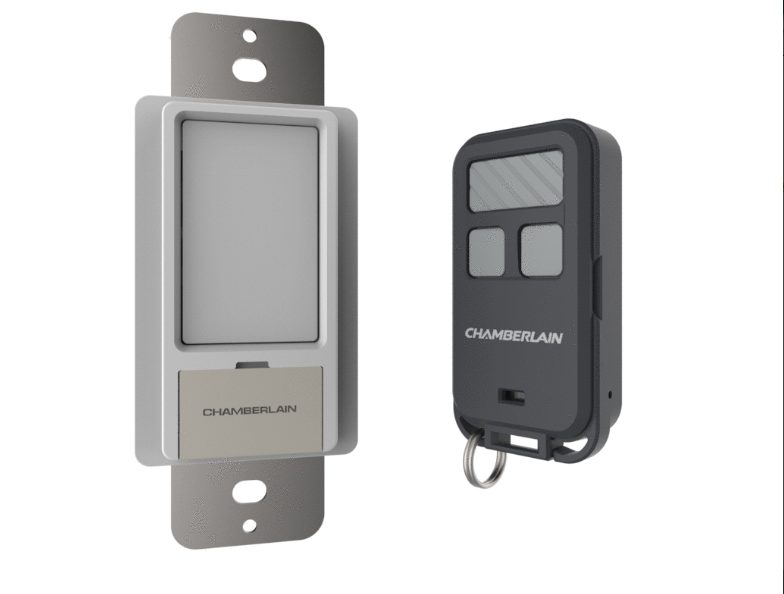
After recently installing the Chamberlain WD1000WF Wi-Fi Garage Door Opener which is INSANELY quiet and controllable via a smart phone app, I found out about the Chamberlain MYQ Light Switch. It allows you to replace a standard light switch, which you can control via the same smart phone app as a MyQ garage door opener as well as a garage door remote control (standard size or mini keychain size) in addition to using it as a regular rocker type light switch. Lastly, you can also pair it with your garage door opener so that whenever your garage door opener lights turn on or off, the lights controlled by this switch will too!
I bought two of these. The first I installed in my garage and paired with the garage door opener. This switches all of the lights (both the in-ceiling and garage door opener lights) on or off together when either the garage door is opened or closed or when the garage door opener motion detector turns on or off the lights. This allows us to pull our car into a very well lit garage and walk out the door without touching a light switch as the garage door opener automatically turns off the lights after a present amount of time.
Once I realized how handy this switch could be, I remembered that I have a flood light fixture for my back yard that is controlled by a switch in my utility room, which is in the middle of my house. It’s so inconvenient to get to, that I almost never turn those lights on. The Chamberlain MYQ Light Switch comes with a mini keychain remote control with three programmable buttons. This gives us the ability to control the lights with either the switch itself, the mini keychain remote, the smartphone app and/or the garage door opener. In our case, we didn’t want it paired with the garage door, so we only use the mini remote and the smartphone app. Now, we finally have the ability to turn on the lights via the mini remote which I velcroed to the wall next to the back door or via the smart phone app from anywhere. I’ve already gotten to use it when I was looking for something in the back yard and needed some light. Out came my iphone with the MyQ app, tap the icon for the light switch and Presto! Let there be light!
I’ve had the two switches installed for several weeks now and they’re working as they’re supposed to. The mini keychain remote can be programmed as an extra garage door opener remote as well as being able to be programmed with up to two other MyQ light switches so that each button controls a different item. If you don’t need the mini keychain remote, you can get the liftmaster version a bit cheaper that only comes with the switch itself (Liftmaster and Chamberlain are the same company).
You should note that this switch needs a proper ground wire in order to work and likely won’t work properly without one.
A couple of tips I got during my installation: as mentioned, it needs a ground (usually bare copper) wire. Also, once it’s installed it needs about 10 minutes to charge up before it starts working. The LED status light hitten behind the rubber rectangle will stop flashing once it has finished charging up.
Installation is pretty easy:
- Shut off the circuit to the switch
- Remove the wall plate and old switch with a screw driver (disconnect the wires from the old switch by unscrewing the side terminals they’re wrapped around).
- Determine which wire now sticking out of the switch box is the “line” (the live power wire) using a voltage detector (cap the wires with a wire nut, turn the power back on then use the voltage detector to see which wire has power – that’s your “line”). There are only 3 wires to connect: the “line” or power wire, the “load” or wire that goes to the light fixture and the ground (usually bare copper) that usually doesn’t carry power. The yellow wire is actually the antenna and doesn’t get connected to anything.
- Twist the wires together and twist on the supplied wire nuts
- Put the switch back in the switch box and secure with the two provided screws
- Put the switch plate cover back on with two screws. Note that the switch doesn’t come with a switch cover. If you’re replacing a Decora style rocker switch with this, you can reuse the existing switch plate cover. If you’re replacing a traditional flip up and down switch with this, you’ll need a Decora style switch plate cover.
I recorded my install on video and have included it here in case it answers any questions you may have. Good luck and have fun with it!